
Overview
The 3CX Web Client is a unified communications interface accessible directly from a browser or via the native Windows and macOS desktop application. This article covers the key features and configuration options available to end users, including logging in, making and managing calls, setting presence status, using chat and video conferencing, and configuring hotkeys and Talk links. Technicians can use this article to onboard new users or troubleshoot common questions about the 3CX client.
Prerequisites
- A provisioned 3CX extension with a valid account
- Access to the "Welcome to 3CX | Your Account Details" welcome email
- A supported browser (Google Chrome or Microsoft Edge recommended)
- SSO credentials (Google or Microsoft) if enabled by your administrator, or the ability to set a password via the welcome email
Logging In
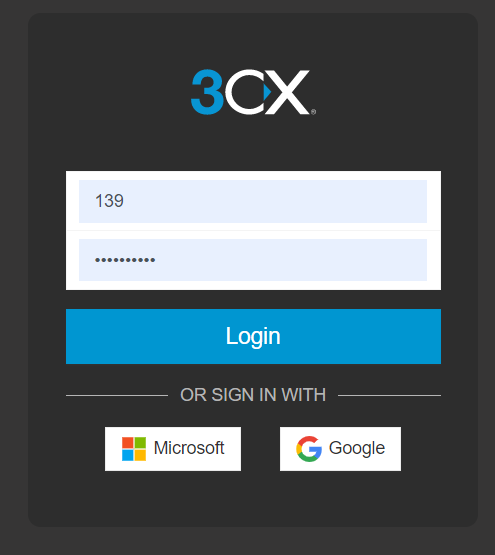
- Locate your welcome email
Open the "Welcome to 3CX | Your Account Details" email sent to you when your extension was provisioned. This email contains your login link and setup instructions. - Use SSO if available
If your administrator has enabled Single Sign-On (SSO), log in using your Google or Microsoft credentials directly from the login page. - Set your password (if SSO is not enabled)
Click the "Set your password" link in your welcome email, then follow the prompts to create a password. - Log in
Navigate to the 3CX Web Client URL provided in your welcome email and sign in using your email address and newly created password.
Install the Web Client as a PWA App
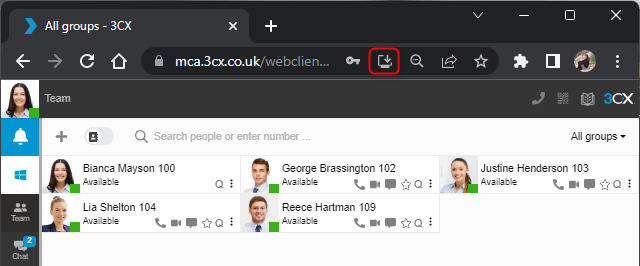
Installing the 3CX Web Client as a Progressive Web App (PWA) gives it the look, feel, and behavior of a native desktop application without requiring a full installation package.
- Open the install prompt from within the Web Client
If no client has been installed yet, click the OS icon displayed beneath your user avatar. A dialog will appear — select "Web App (PWA)" and click the "Install" button. - Install via the browser address bar
Alternatively, click the Install button (depicted as a screen with an arrow) located in the browser's address bar, then confirm the installation when prompted. This button is circled in red in the screenshot above.
Set the App to Auto-Start
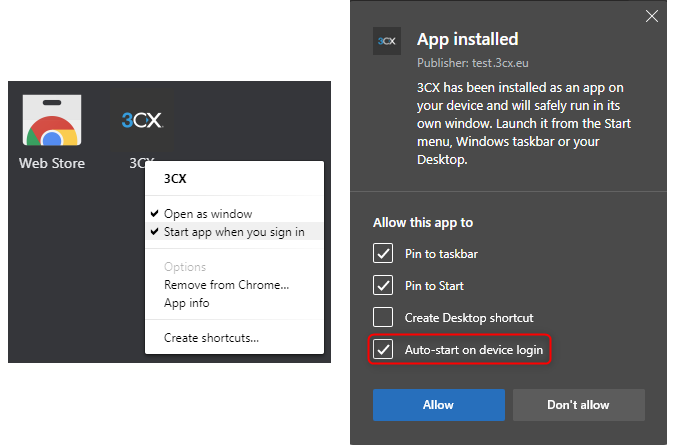
- Google Chrome: Open Chrome and navigate to
Right-click on 3CX and enable "Start app when you sign in".chrome://apps - Microsoft Edge: When the post-installation dialog appears, select the option to Auto-start the app on sign-in.
Click2Call Browser Extension
The 3CX Click2Call browser extension converts telephone numbers on any webpage or CRM system into clickable hyperlinks. Clicking a hyperlinked number automatically sends it to the 3CX Web Client or Desktop App to initiate the call. Extensions are available for both supported browsers:
After installing the extension, open Configuration Settings to:
- Choose whether calls are placed via the Desktop App or the Web Client.
- Specify website URLs that should be excluded from number hyperlinking (e.g., an internal accounting portal where phone-formatted numbers should not be made clickable).
Making Calls
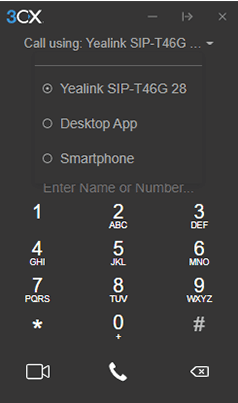
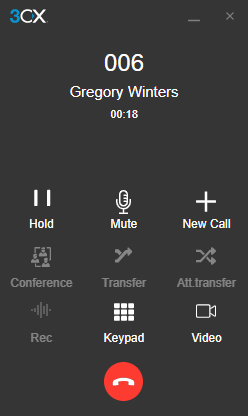
- Open the dialer
Click the dial pad icon in the top-right menu, or use the search icon to find a contact by name, extension number, or email address. - Enter the destination
Type a phone number or begin searching for a contact. The search supports names, extension numbers, and email addresses. - Select your device
Use the phone selector in the dialer to choose which device should place the call. Options include your IP desk phone, iOS or Android mobile app, Web Client, or Desktop App — any device on which your extension is provisioned. - Initiate the call
Click the handset icon to start the call.
In-Call Actions
Once a call is active, the following actions are available directly from the Web Client interface:
- Blind Transfer: Click "Transfer" and enter the name or number of the recipient. The call is transferred immediately without announcing it to the recipient first.
- Attended Transfer: Click "Att. Transfer" to place the caller on hold, speak with the intended recipient first, and then complete the transfer once the recipient is ready.
- Conference Call: Click "Conference" and enter the name or number of additional participants. Each participant will be dialed and added to the call upon answering.
- Record Call: Click "Record" to begin recording at any point during the call. Click again to stop. Recordings are accessible in Web Client > Recordings, subject to user permissions.
- New Call: Click "New Call" to start a second call on a separate line without ending the current call.
- Escalate to Video: Click the Video icon in the dialpad to elevate the current audio call to a video call without interruption.
Managing Your Status & Queues
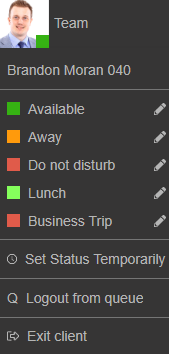
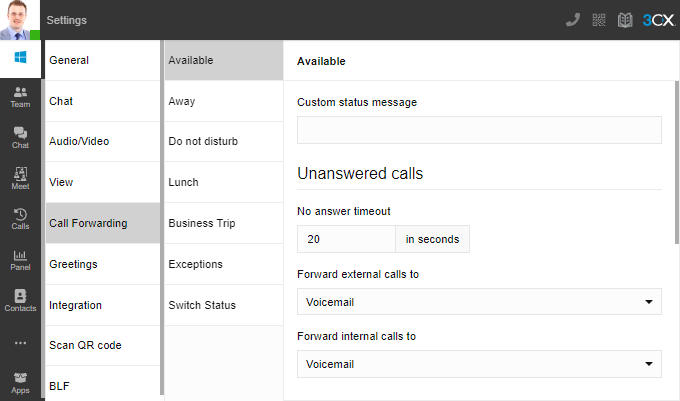
Presence status allows colleagues to see your availability at a glance. Setting your status accurately helps reduce unnecessary interruptions and ensures callers are handled appropriately.
- Set your status
Click your avatar in the top-left corner of the Web Client. Choose from: Available, Away, Do Not Disturb, Lunch, or Business Trip. Your status indicator turns yellow automatically when your line is busy on a call. - Set a temporary status
Click your avatar and select "Set status temporarily" to apply a status for a defined period of time. It will revert automatically when the time expires. - Log in or out of queues
Queue membership can be managed from the same avatar menu. Log in to begin receiving queue calls, or log out to stop receiving them. - Set a custom status message
Click the pencil icon next to your status to enter a custom message visible to colleagues. - Configure advanced status and forwarding behavior
Navigate to Avatar > Your Name > Call Forwarding to access the following options:- Set a custom status message
- Enable or disable push notifications per status profile
- Rename the Lunch and Business Trip profiles to match your organization's terminology
- Set the number of seconds before unanswered calls are forwarded for the Available and Lunch profiles
- Choose forwarding destinations for unanswered calls (e.g., Voicemail, mobile number)
- Override forwarding rules based on Caller ID or time of day
- Define custom office hours and break times for your extension
Auto-Switch Status Based on Working Hours
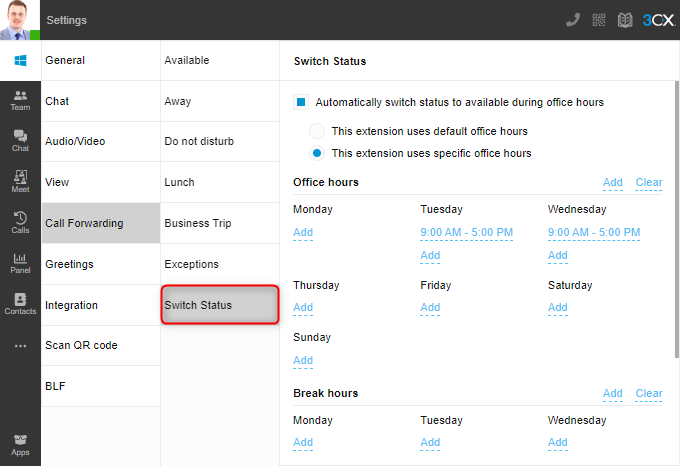
You can configure your extension to automatically change status according to a custom schedule. Navigate to Settings > Call Forwarding and define your office hours and break times. Once configured, the extension will automatically switch between statuses based on the schedule — no manual intervention required.
Choosing Your Team View
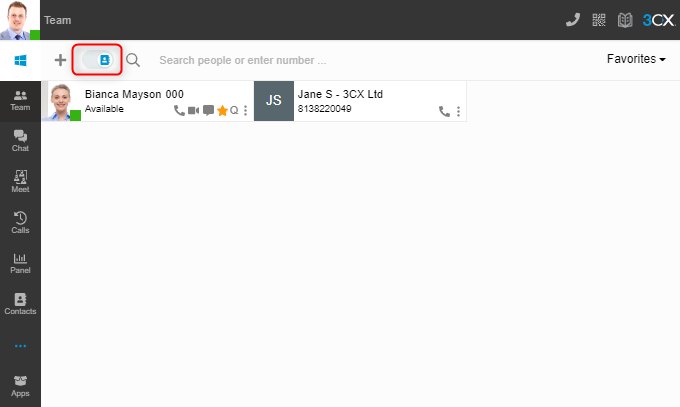
The Team view displays all members of the groups you belong to by default. To customize this view:
- Use the View dropdown in the top-right corner to filter by a specific group (e.g., Marketing, Sales).
- Press the star icon on any contact to add them to your personal Favorites list for quick access.
- Toggle the contacts option to display your personal contacts alongside team members in the same view.
Chatting with Colleagues and Customers
Navigate to Web Client > Chat to access the unified messaging interface. From here you can:
- Send and receive instant messages with internal colleagues.
- Manage inbound customer messages from Live Chat, WhatsApp, Facebook, and SMS/MMS — all from one interface.
- Use quick response chat templates (created and managed by group managers) to reply with predefined messages, reducing response time. Templates can be organized by category and language.
For detailed information on composing chats, SMS messages, and using advanced chat features, refer to the 3CX Business Chat Manual.
Starting a Video Conference
Navigate to Web Client > Meet to start an instant video conference or schedule one for a future time. For full details on video conferencing features, refer to the 3CX Video Conferencing Manual.
Setting Up Hotkeys
Hotkeys are available in the 3CX Desktop Application only. They allow you to assign custom keystroke combinations to common call actions such as opening the dialer, answering an incoming call, or initiating a blind transfer.
- Open the Desktop Application
Launch the 3CX Desktop App on your Windows or macOS computer. - Navigate to Settings
Click "More" in the left-side navigation panel and select "Settings".
- Select the Hotkeys section
From the dropdown menu in the top-right of the Settings screen, select "Hotkeys". - Assign key combinations
On each action line, click the pencil icon and then press the desired key combination on your keyboard to assign it.
3CX Talk Link
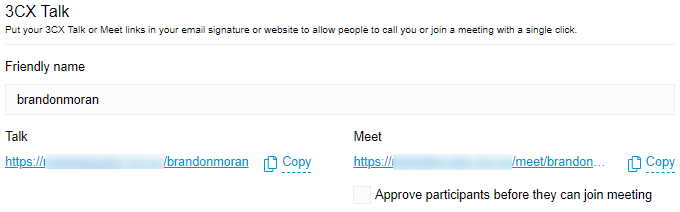
A 3CX Talk link allows anyone to call or meet with you for free directly from their browser — no app or account required. These links can be placed in email signatures, on websites, or shared via any communication channel.
- Navigate to Settings
Click "More" in the left-side navigation panel and select "Settings". - Locate the 3CX Talk settings
Under the General section, find the 3CX Talk settings block. - Set a friendly name
Enter a friendly name into the field. The Talk and Meet links will update automatically to reflect the name you enter. - Configure meeting approval
Use the checkbox to require that participants be approved before joining a meeting via your Meet link.
Notes & Tips
- Hotkey configurations are stored in Local Storage and apply only to the Desktop App. They are applied globally, meaning they will override any conflicting shortcuts used by other applications or the operating system.
- Do not assign hotkey combinations that are already in use by your operating system (e.g., Ctrl+Alt+Del on Windows) to avoid conflicts.
- Call recordings are only accessible in Web Client > Recordings if your extension has been granted the appropriate permissions by your administrator.
- The Blind Transfer connects the caller to the recipient immediately without prior announcement. Use Attended Transfer when you need to introduce or screen the call first.
- The PWA installation is the recommended client for users who prefer a browser-based experience with native app behavior, particularly where the full Desktop App cannot be installed.