
Overview
This article explains how to download, install, and configure the 3CX Client for Windows. The Windows client allows users to manage phone calls, video calls, chat messages, and advanced call features directly from their desktop. A technician would use this guide when onboarding a new user or setting up 3CX on a Windows workstation.
Prerequisites
- An active 3CX extension assigned to the user
- Access to the 3CX Web Client at your company's 3CX web address (email help@soho-integration.com if you don't have it)
- Windows desktop or laptop with sufficient permissions to install software
- User credentials (extension number and PIN or password) for the 3CX system
Steps
- Log In to the 3CX Web Client
Navigate to your company's 3CX web address (email help@soho-integration.com if you don't have it) and log in with the user's 3CX credentials. Once logged in, open the side menu and go to Apps > Windows App. - Download and Run the Installer
Click Install to download the Windows client installer. Once the download is complete, locate and run the executable file (.exe) to launch the setup wizard. - Complete the Setup Wizard
Follow the on-screen prompts in the setup wizard. Accept the License Agreement terms when prompted, then continue through the wizard to complete the installation. - Download the Configuration File
After installation, return to the 3CX Web Client and navigate back to Apps > Windows App. In the pop-up window, click Download to download the configuration file (typically a.3cxprovisioning file). This file automatically provisions the client with the user's extension settings.
- Open the Configuration File
Open the downloaded configuration file. The 3CX Windows Client will launch automatically and import the extension configuration. No manual entry of server details is required. - Verify Successful Configuration
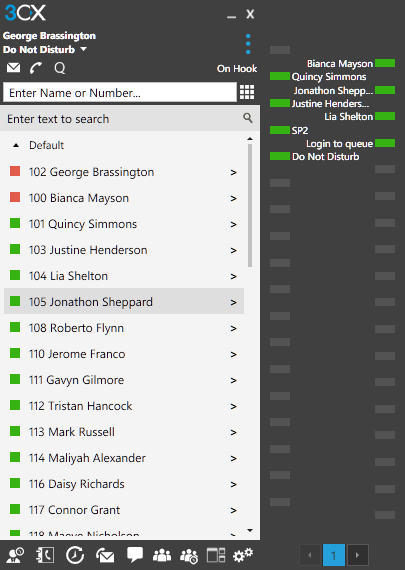
Once the configuration file has been imported, confirm that the client displays the user's extension and that the status shows as On Hook. This indicates the client is registered to the 3CX server and ready to make and receive calls.
Notes & Tips
- If the status does not change to On Hook after importing the configuration file, verify that the workstation has network connectivity to the 3CX server and that no firewall rules are blocking SIP traffic.
- The 3CX Windows Client supports advanced features including Queue Manager, Wallboard, Receptionist view, and BLF (Busy Lamp Field) monitoring — these can be accessed via the side menu once the client is configured.
- The configuration file is tied to the specific extension. If a user's extension changes, a new configuration file must be downloaded and applied.
- Ensure only one instance of the 3CX client is running on the workstation at a time to avoid registration conflicts.
References
- 3CX Video Conferencing – User Manual
- your company's 3CX web address (email help@soho-integration.com if you don't have it)