
Overview
This article covers the core features of the 3CX Windows client, including switching between softphone and desk phone modes, managing availability status, making and managing calls, scheduling video conferences, and customizing application settings. Technicians and end users can reference this guide when onboarding to 3CX or troubleshooting common usage questions.
Switching Between Softphone and CTI Mode
You can switch between Softphone and CTI mode at any time using the phone selector located beneath your name and status in the client.
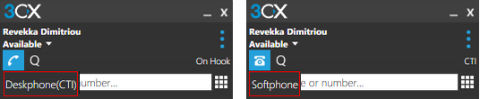
- Softphone: Enables you to make and receive calls directly through your PC or laptop using a headset or built-in audio — no physical desk phone required.
- CTI (Computer Telephony Integration): Allows you to make and receive calls through a paired desk phone while controlling it from within the Windows app. For a list of compatible devices, see 3CX Supported IP Phones.
Managing Your Status
Your status is visible to colleagues and helps communicate your availability. It can also trigger automatic call forwarding rules depending on configuration.
- Set Your Status
Click the status selector beneath your name and choose from the available options: Available, Away, Do Not Disturb, Lunch, or Business Trip. - Customize Your Status
Click the arrow next to your selected status to add a custom message and configure call forwarding options specific to that status.
Making and Managing Calls
Use the built-in phonebook to search for colleagues by name, extension number, or email address. To call an external number, enter it manually via the dialpad, then click Call.
During an active call, the following in-call controls are available:
- Transfer (Blind Transfer)
Transfers the call directly to another extension or number without speaking to the recipient first. - Att. Transfer (Attended Transfer)
Places the current caller on hold while you speak with the intended recipient to confirm they can accept the call before completing the transfer. - Conference
Creates an ad hoc conference call, allowing you to add additional participants to the conversation on the fly. - Rec (Record)
Starts a recording of the active call. Depending on your system configuration, recordings may be stored on the 3CX server. - Video
Escalates the current audio call to a video call, with the additional option to share your screen. See 3CX Screen Sharing for more details.
Creating or Scheduling a Video Conference
When initiating a conference, you can choose between a standard Video Conference or a Webinar. Each profile has distinct default settings that can be adjusted to suit your needs.
To change the video conferencing profile in the Windows client:
- Open Settings
Click the Settings button within the 3CX Windows client.
- Select a Conference Profile
Choose either Video Conference Profile or Webinar Profile depending on the type of meeting you are hosting. - Adjust Profile Settings
Each profile includes configurable options:- Participant Rights: Control whether participants can use Audio, Video, and/or Chat.
- Meeting Options: Configure co-host permissions, whether the meeting starts when the organizer joins, and whether participant names are hidden.
Customizing Your Settings
The Settings menu provides access to a full range of personalization and configuration options. Navigate to Settings within the client to access the following:
- Status Configuration: Set call forwarding rules and exceptions for each individual status (e.g., forward calls to voicemail when set to Do Not Disturb).
- Configure Accounts: Switch between multiple extensions or accounts — particularly useful in hotdesking environments.
- Audio Options: Select your preferred microphone and speaker devices, and configure advanced audio settings such as echo cancellation.
- Video Options: Choose your camera input device and configure video quality preferences.
- Hot Keys: View and modify keyboard shortcuts for controlling the app without using the mouse.
- Advanced Settings: Configure app behavior (such as bringing the window to the foreground on incoming calls), set the application language, enable Auto Answer, and review integration options.
- Themes: Switch between light and dark themes, or set a custom background image.
Notes & Tips
- If you experience audio or registration issues, navigate to Settings and use the Re-register option to force the extension to re-register with the 3CX server.
- If a user has not received or has lost their setup credentials, the Welcome Email can be re-sent from within Settings.
- CTI mode requires a compatible SIP desk phone paired to the user's extension. Verify compatibility at 3CX Supported IP Phones before attempting to use this mode.
- Call recording availability may depend on the user's extension permissions configured by the 3CX administrator.